April 7, 2022
Cutscenes are a common occurrence in RPGs. In this tutorial we will look at ways to make cutscenes, as well as go over some tips and tricks to keep in mind while making them. We will demonstrate these by making a cutscene where Reid enters town, walks, then a dog and Kasey run past him and out of town. We will use the Snow Town MZ sample map for reference.
Starting Settings
First thing to know about making a cutscene is you should use one event for the entire cutscene. Do not spread it out via parallel processes or switches! Doing that is very confusing and you can easily get lost finding and fixing errors in your cutscene. Instead use just one event set to autorun to run your entire cutscene. The only time more than one event is needed is if the cutscene is over more than one map, as events can only control events on the same map.
For purposes of making a cutscene, I always put my event that will be doing all the work near the cutscene when making the scene. Once it is more final I move the event to the upper left hand corner of the map where I store all of my events that affect the entire map. This event, which I will call the controlling event going forward I name Cutscene Autorun. The event is set to autorun too, so that this event has total control.
Next, I always start my cutscenes with a fade out, so that I can do background processing before the player sees anything. This is things like moving events into position, turning on switches, etc. What I usually do is I first call a move route event, set it to player, and call Through On, Transparent On. This is so the player does not interfere with the cutscene. This is done as follows:

Notice the dropdown box at the top? If we select that we can select any event on the map. Select player, then in the move route put Through ON, Transparent ON.
Next I turn on my cutscene switch, which I call scene 1, and set to switch 21 in the database. I use switch 21 as plug-ins use switches 1 – 20 in my games, though which switch works best for you will vary. Personally I reserve switches 21 – 30 as follows:
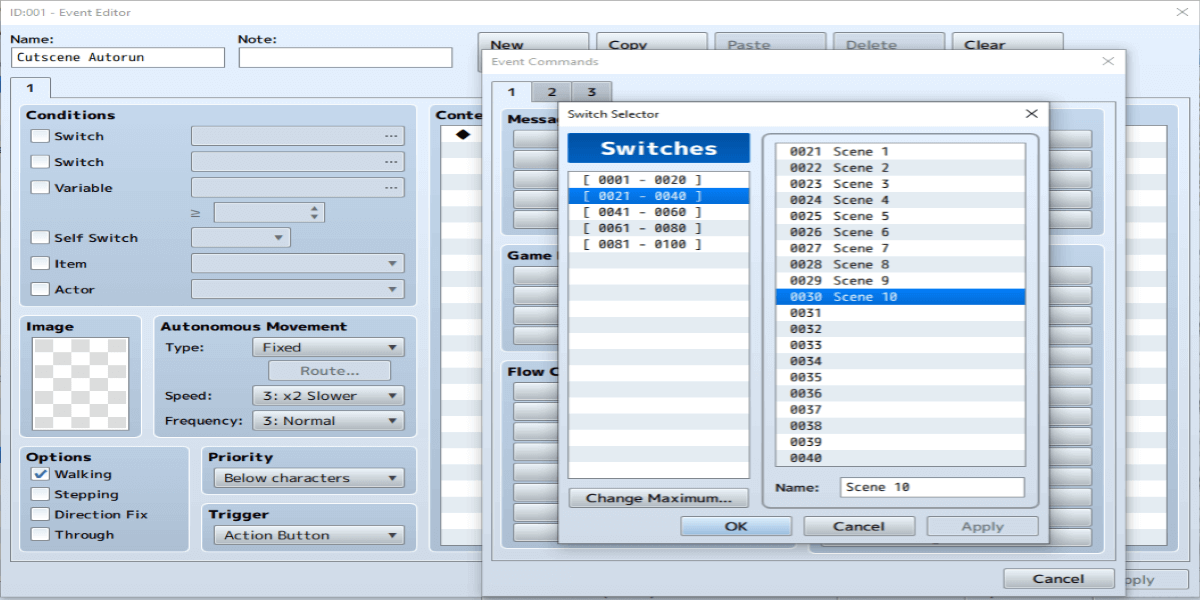
All 10 of those are reserved for cutscenes as needed, though rarely will more than 2 ever be needed. Still it's easier to reserve them now than it is to add them in mid development.
Now, as for what switch 1 does? This makes visible events that only show up when my cutscene runs. The events look like the following:
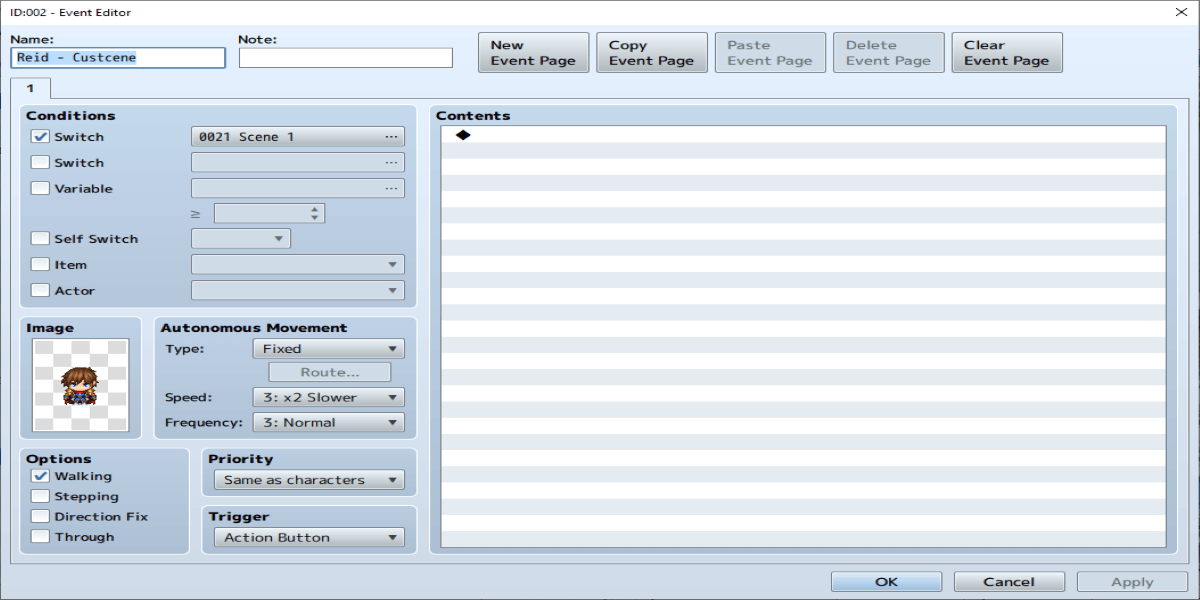
All events that will only show up for this cutscene are set up the same. They are set to only show when that switch is ON, and are empty events set to trigger action button. The reason for this is your controlling event is going to do the work, not this event. This event only exists so you have a Reid graphic in your scene.
All events that are to only show up in my cutscenes I put on the map in a spot that will never be visible to the player. I use the upper left hand corner myself, though if your map has that zone visible you may need to put the events elsewhere. For example, this is my cutscene events for a winter town map, all 5 of the events in the upper left hand corner are set up the same as the Reid event.
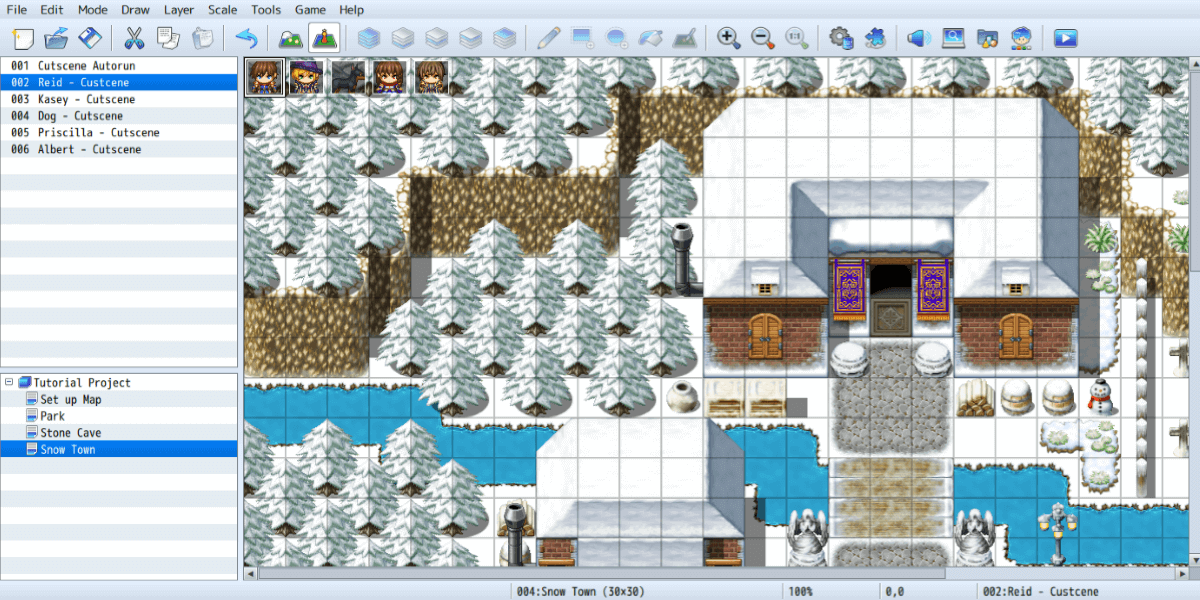
Notice also that all events are named. This will be important when we write our cutscene.
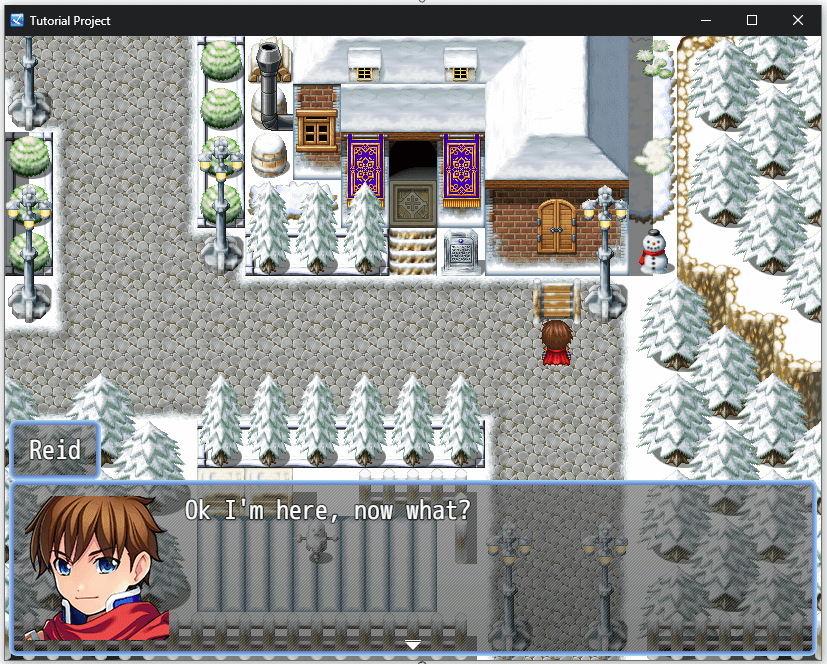
Next in our setup, we use set event location to move any event to where it should be for our cutscene. For this example, let’s assume Reid has just entered the town. Since we hid the player sprite we now use Set Event Location then on the dropdown select Reid – Cutscene and move it where the player sprite was. Do the same thing with any other sprite you want in the cutscene when it starts, but for this example we will start with just Reid in the scene. Once all setup stuff is done, fade in and your cutscene is now starting.
Not terribly exciting so far I know, as right now the entire cutscene is a sprite of Reid on map, and you are unable to do anything. So let’s show Reid walking now. To do that we use Set Move Route, then we select the drop down that you see here:

Select Reid - Cutscene, which is highlighted in the image above. Then, we will tell it to move forward a few steps as follows:
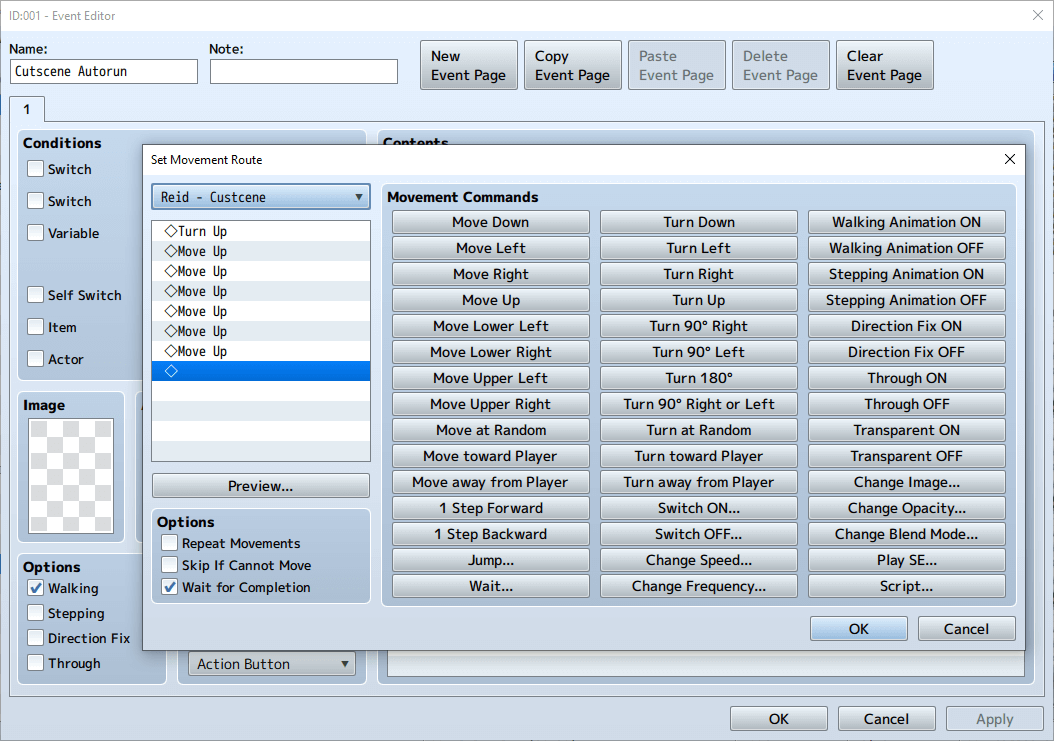
Finally, decide if you want wait for completion checked or not. Wait for completion will have all other processing wait until the event finishes moving. Note that if something blocks your event from finishing the move route, the game will hang so make absolutely sure the route is clear. In this case there are no other events besides our cutscene events so the route is perfectly clear. Once we set this, select ok, and now our cutscene will have Reid move 6 tiles up from the starting point.
Good question Reid. So far all our cutscene does is have Reid move up 6 tiles from the map entrance. Let’s have a dog run past now, with Kasey chasing it. We will do that event by first using Set Event Position as such:
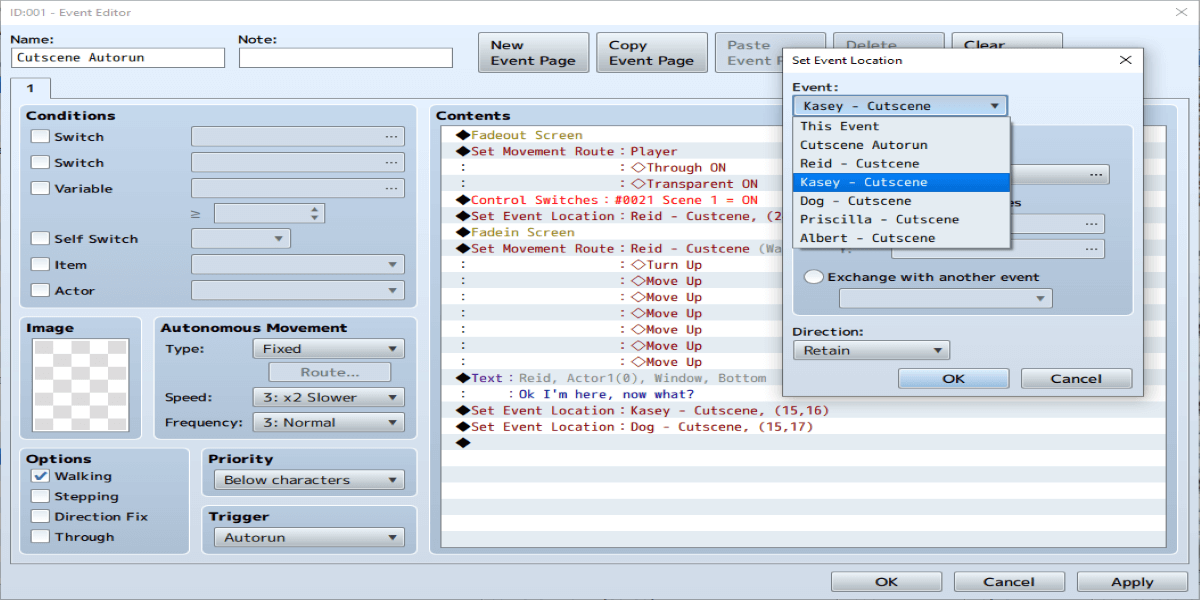
We first select the drop down on Set Event Location to tell it to move the Kasey Sprite to the location we want it to start from. In this case we selected a tile that is currently offscreen. The same thing is done with the dog, which is one tile below Kasey. Once these are in location we will call set move route on the Dog first, and have it run up to Reid, barking as it goes. The move route for the dog will look as follows:
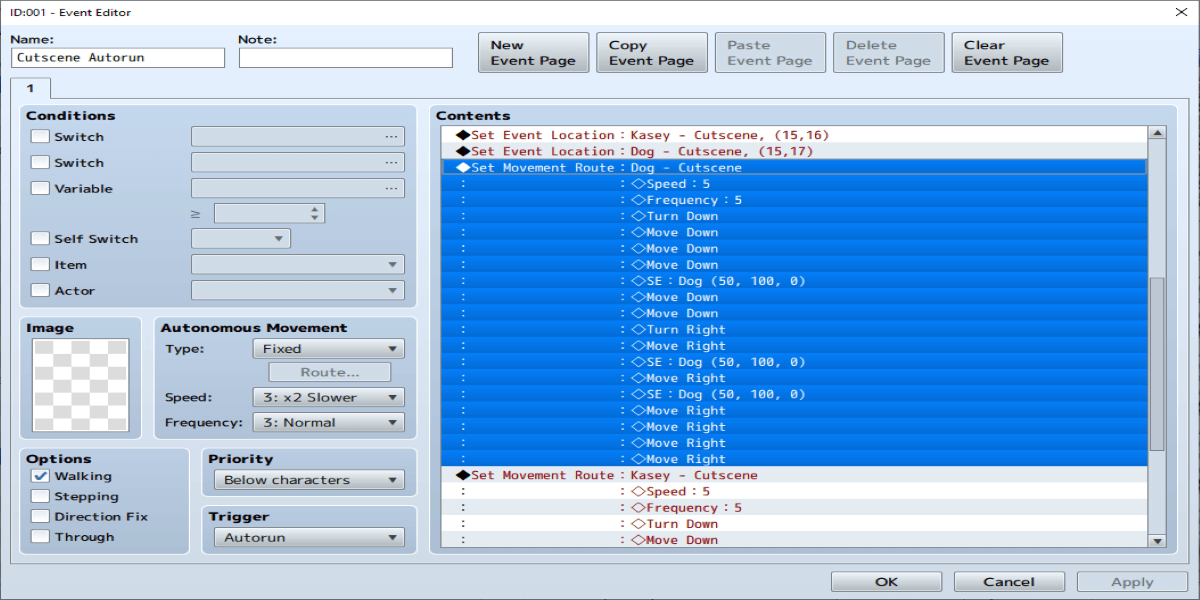
The move route for the dog is highlighted. In this case the dog is first set to a high speed and frequency so it does not move really slowly. I used 5 for both but which works will depend on your game and how fast you want them to be moving. Then I have the dog move 6 tiles down and 6 tiles to the right. In there you will see the command SE: Dog (50, 100, 0) three places though. That is to make the dog bark as it moves. As for how I did that, there is a command in Set Move Route called Play SE, you can find it here:
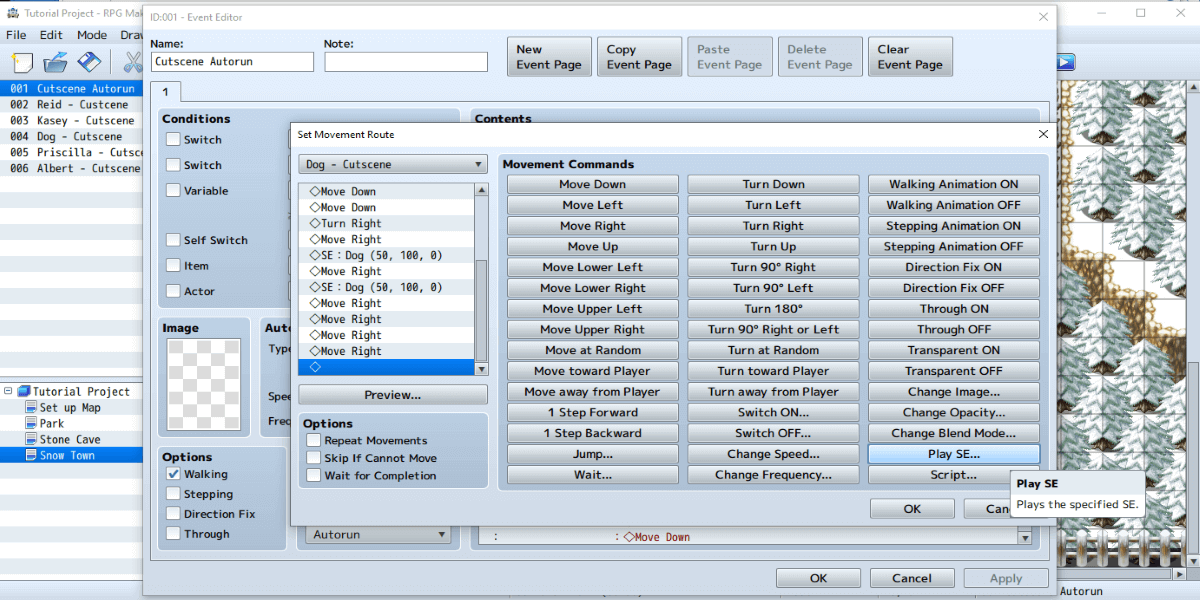
Play SE is a good Movement Command to keep in mind as you can make sound effects more in synch with moving sprites this way.
After the dog event, we also call Set Move Route for Kasey. Since she starts 1 tile behind the dog, she needs to go down 7 spaces and right 5 instead. Her move route looks as follows:
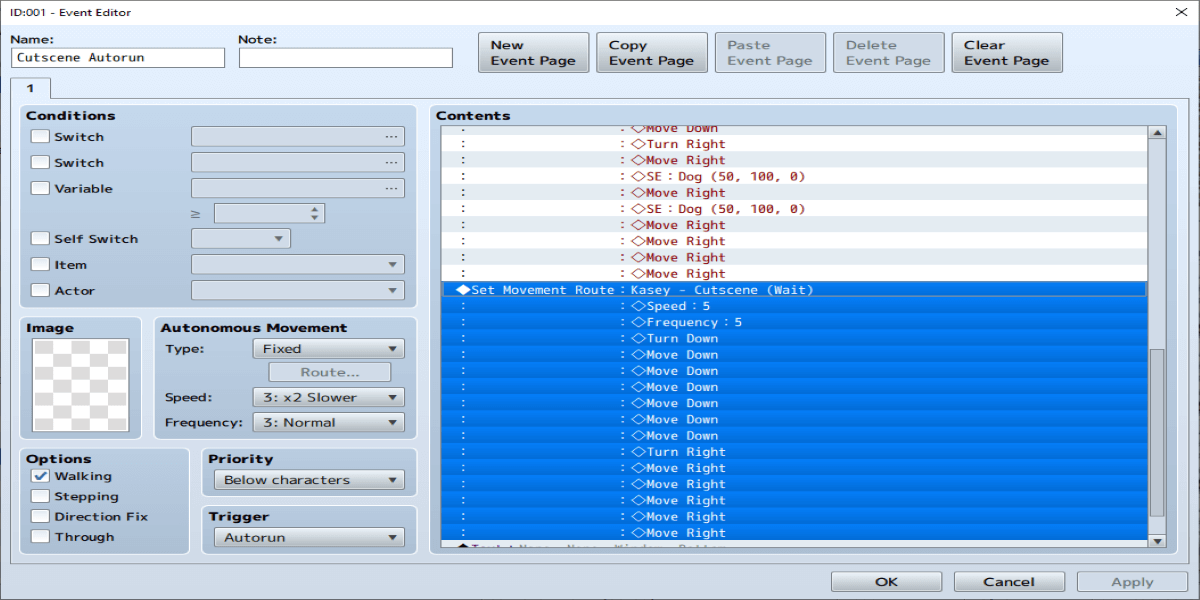
For Kasey’s move route we checked wait for completion. This will have both her and the dog moving at once, but nothing else will as it will wait until Kasey’s move route is done. At this point in time, once the dog and Kasey are done moving, the scene looks like this:
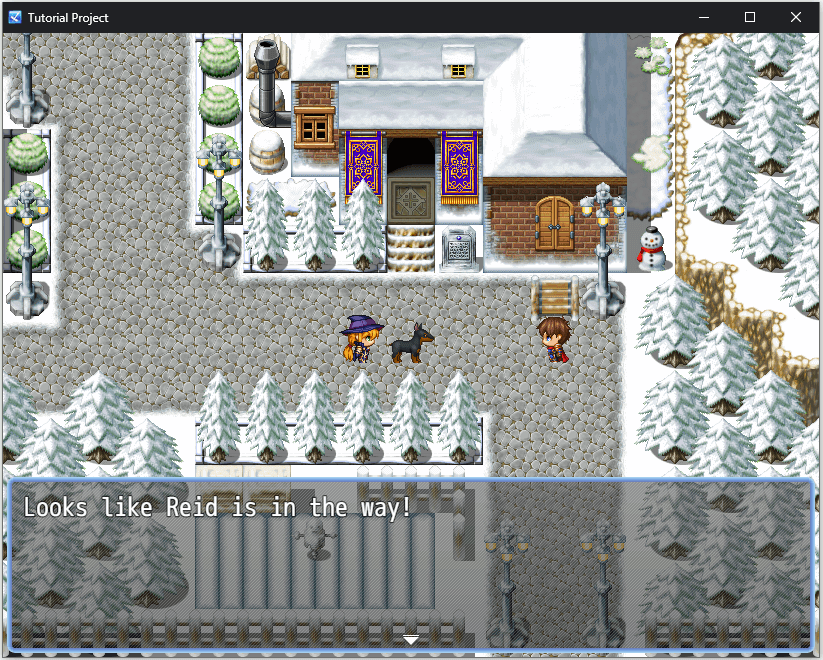
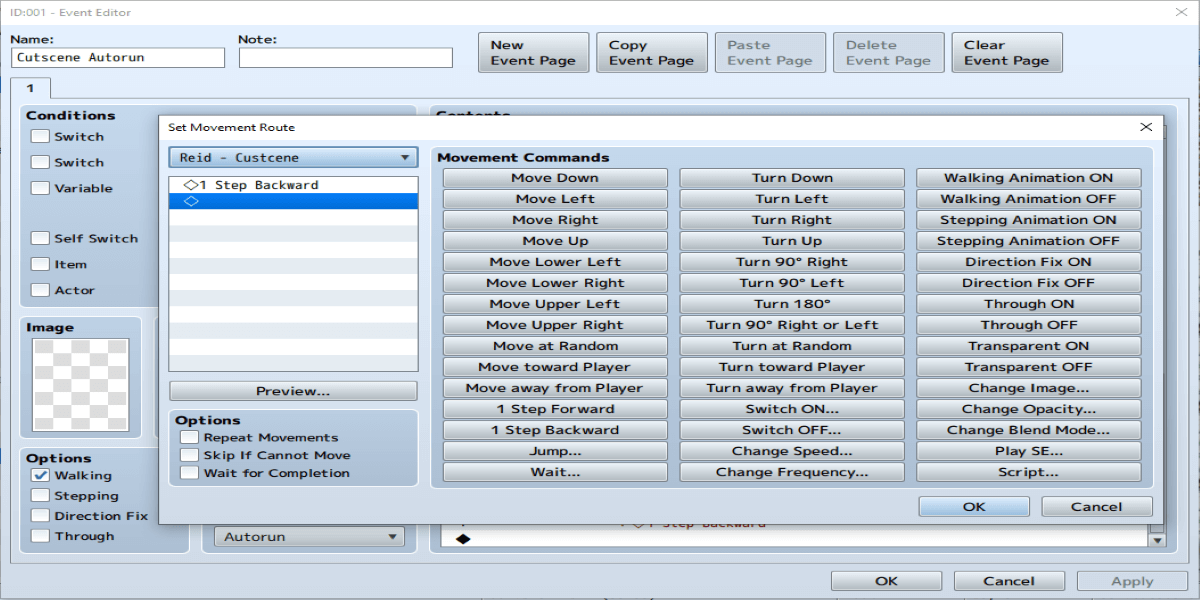
This is where the events end after all move routes are done. Now let’s have Reid get out of the way, then the dog and Kasey will run past and out of town. First, to have Reid get out of the way, use Set Move Route -> Reid – Cutscene, and use the command One Step Backwards.
Then we will finish the dog and Kasey’s move route. The dog will move until it is off the map, then when it is on the last tile before map transfer we put in our move route Through ON, Transparent ON. The move route looks like this:
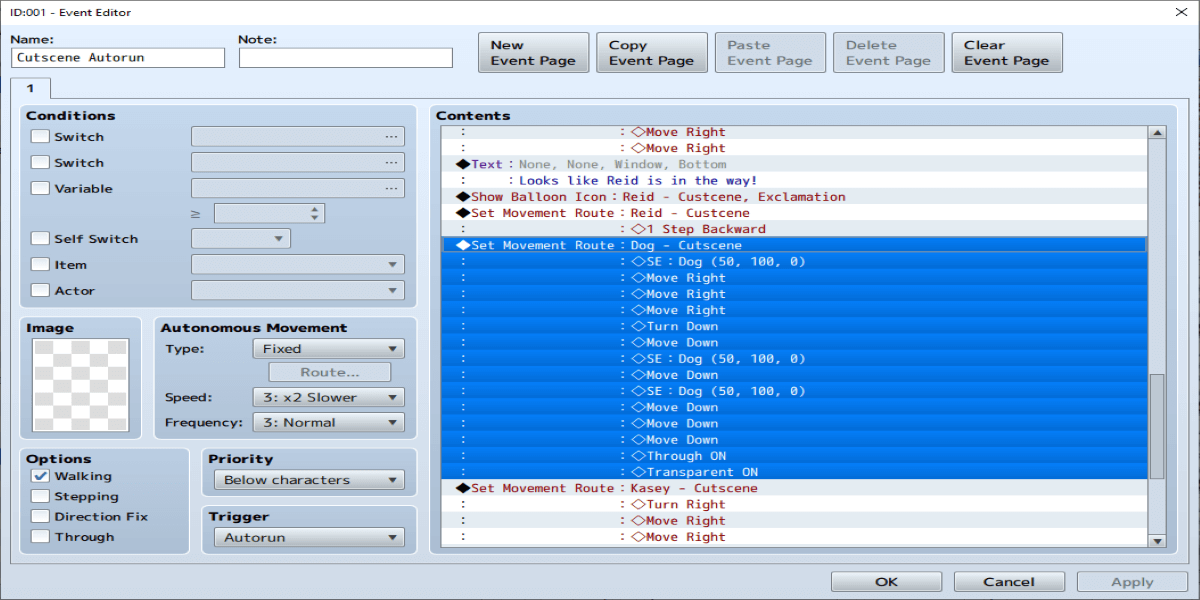
The Through ON Transparent ON is so it is not stuck on the transfer event at the end and vanishes off the map like it should. Kasey’s move route is similar, though the full move route is not shown in this tutorial.
Now, to close this, let’s say we want Reid to first move that 1 step backwards, then turn to face the dog and Kasey as they leave the map. To do that, we will move Reid’s move route to last in the sequence. The order does not matter as anything between wait until completions will run all at the same time, so always put the event you want everything else to wait for last. So we will now copy and paste Reid’s one step backwards and put it last, and add an exclamation balloon too, to show some reaction to this. The one step backwards will have wait until completion checked, then below it there is another event that is Set Move Route -> Reid -> Turn down. The event sequence at the end now looks like this, with the Dog’s Move route first then Kasey then Reid’s one step backwards, then Reid’s turn down. The end of the event looks like this:
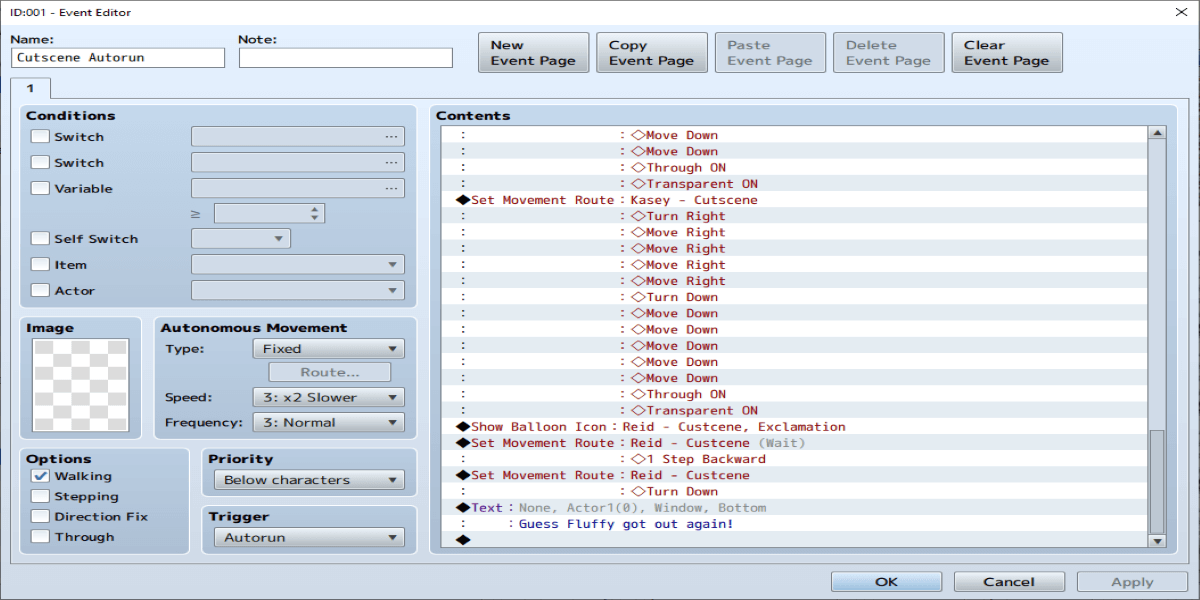
Notice we added a text to show Reid’s response to all of this as well.
Now that the cutscene is done, we need to do any processing to clean it up. To do that I usually do a fade out, then turn off any cutscene switches I have turned on (switch 21 in this case). I also do a Set Move Route -> Player -> Through OFF, Transparent OFF. This is needed so you can move around again. You also may need to do a player transfer event to have them start where the cutscene ended, as right now you will not be in the same place the Reid Sprite was at the end of the scene. Once all of that is done, do a fade in, and then make sure the autorun doesn’t repeat by either turning on a self switch or a regular switch or increasing a variable. We’ll use self switch A for this demonstration. Below is our event with all post cutscene stuff highlighted.
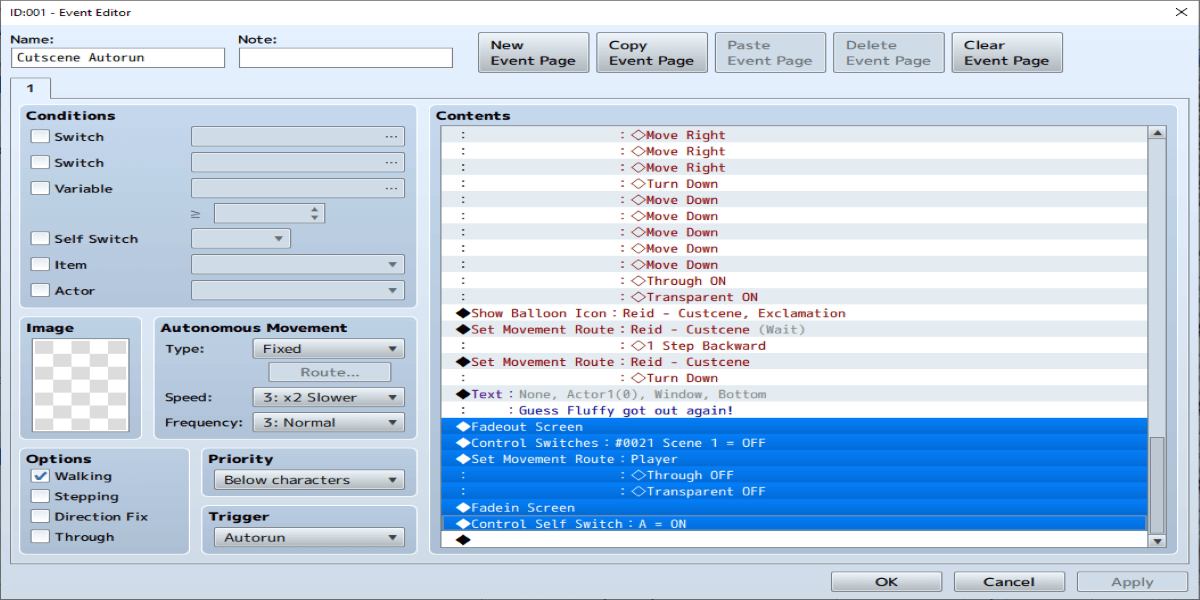
Be sure to put a page 2 set to only self switch A ON else this event will still loop! Your page 2 should look like this:
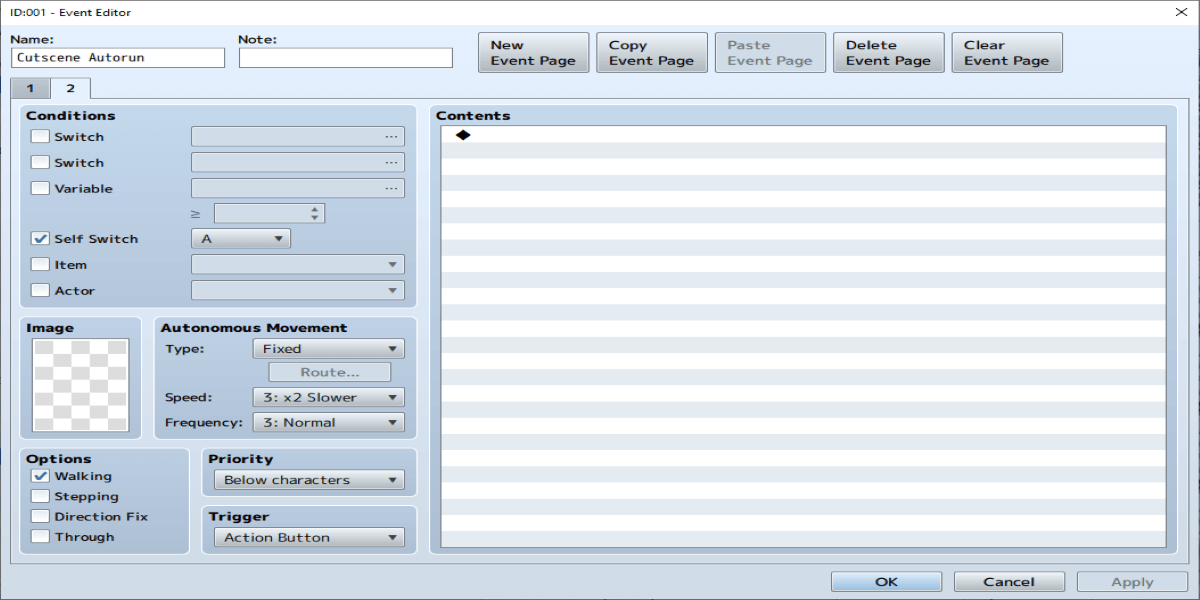
Put nothing on page 2, and keep it at action button. The only reason to put anything here is if you wish to do something after the cutscene is over.
As you can see, there are a lot of steps in making a cutscene. The important thing though is to realize that you can do all of the work in one event, as long as you stay on the same map. Use Set Move Route Commands, Switches and Set Event Position Commands to move things around to where you need them. Where exactly they will be needed will depend on your game and your map so you will need to experiment some. Also as we showed here you can break up a move route some so that you can have other events move at the appropriate time. Instead of the dog and Kasey doing one big full move route, we had the first set stop a few tiles short with a wait until completion, then did the second half of the move route with Reid moving at the appropriate time.
With all of this in mind, now try to make a similar cutscene. Use one of the sample maps and duplicate this scene. You will need to change up the move routes as what is a free tile and what isn’t will change depending on the map. Also where to have Kasey and the dog start so that they are offscreen will depend on the resolution you set your game at. For reference the final cutscene can be found here, and in the video we show the final version of the event as well: Cutscene Demonstration and Event - YouTube
What cutscenes will you make in RPGMaker with what you learned here?