November 30, 2021
The default RPG Maker menu works well, but sometimes you want one that fits your game’s aesthetic better or offers only the important options. Eventing your own picture-based menu is a great way to make sure your menu fits your game, so let’s take a look at how to make one.
This tutorial will cover how to make a menu that is navigated with the keyboard. If you want to be able to use a mouse to navigate, then you’ll want to check out a plugin that lets you click on pictures. There are a few options available, so pick one that plays well with the rest of your project.
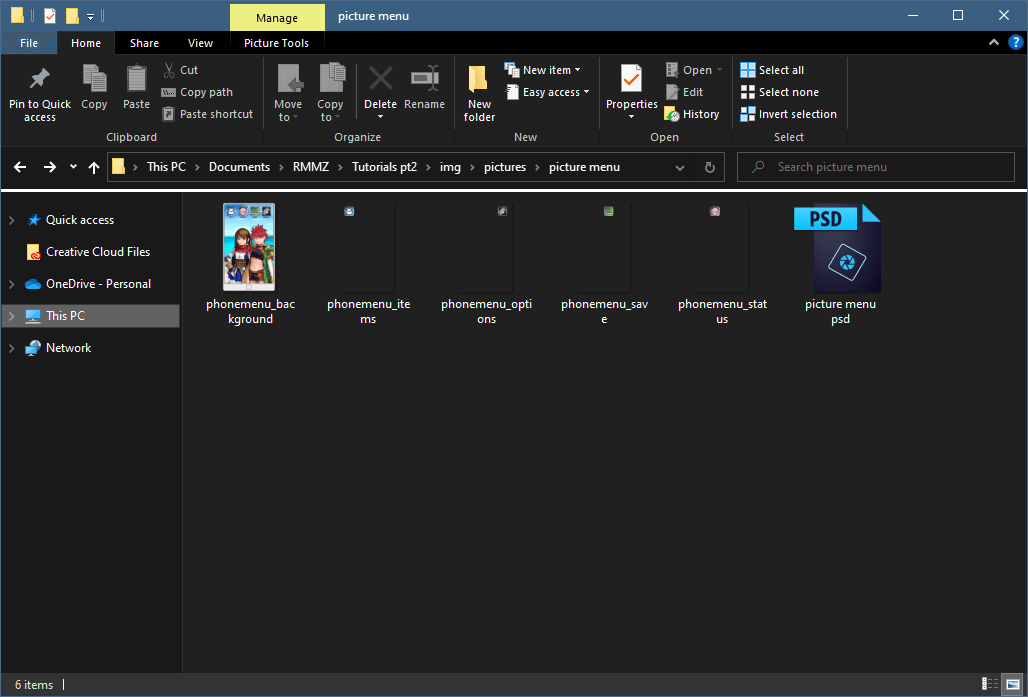
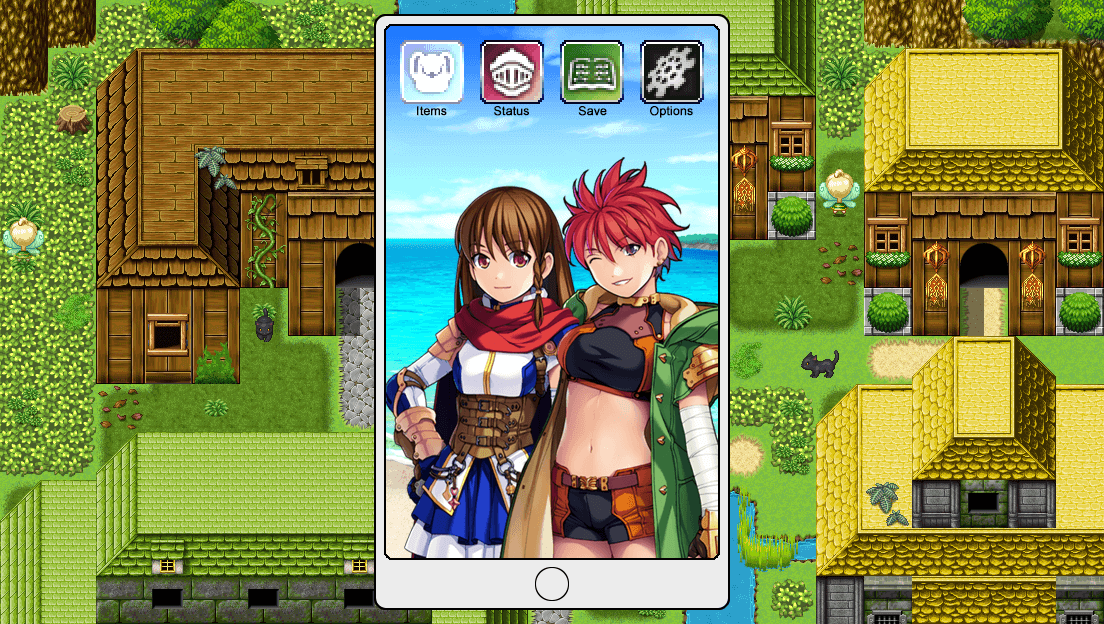
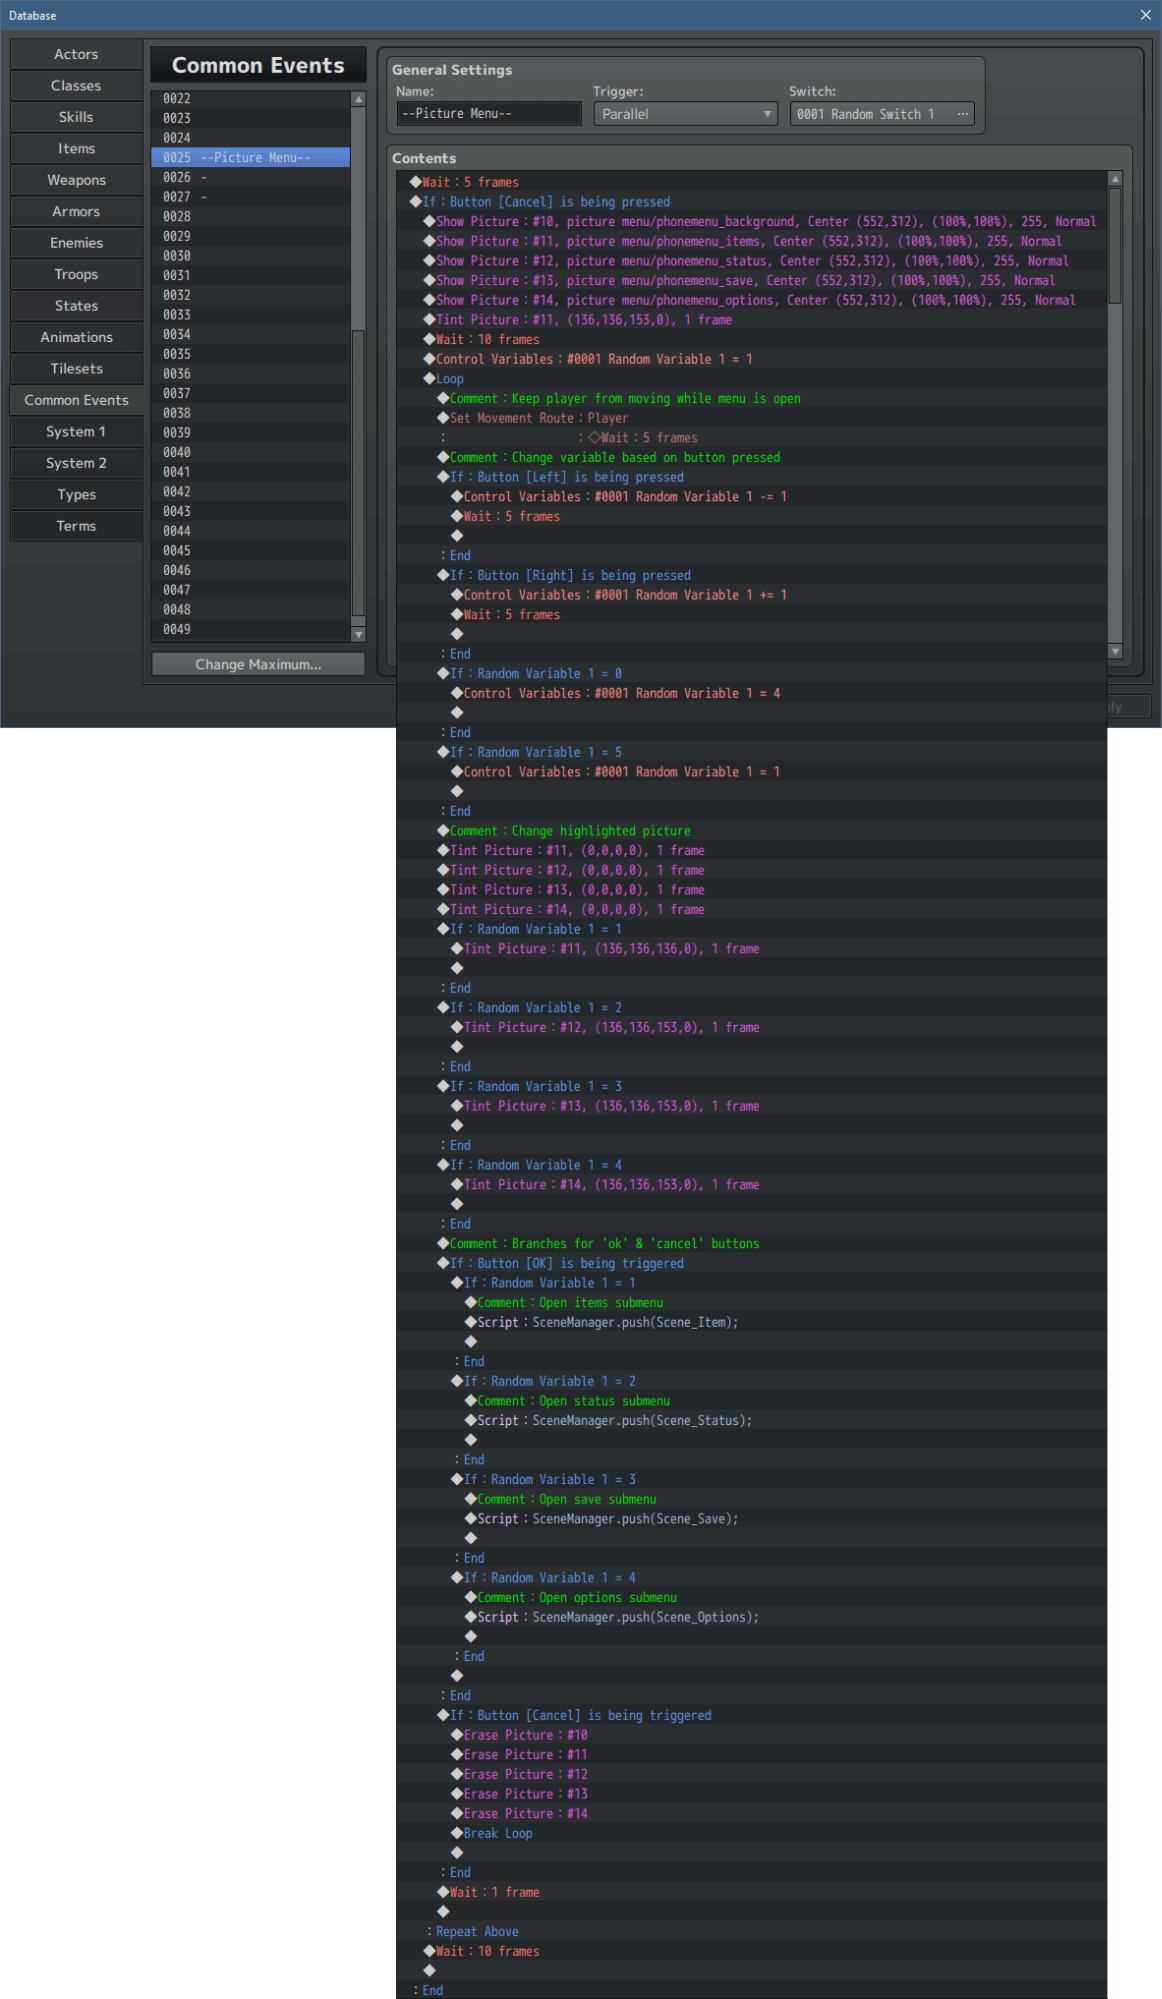
No matter what way we choose to navigate the menu, we’ll need something very important before we can make our menus: pictures! Without our pictures our menus won’t exist, so we need to make some. For this tutorial I made a simple background that looks like a cell phone, along with a separate picture for each menu option that we’ll be able to select. To make it easy to place them all in the right spots on the screen without needing to do lots of math or adjustments, I’ve made the menu option pictures the same size as the background so I can use the same X and Ys for each picture.
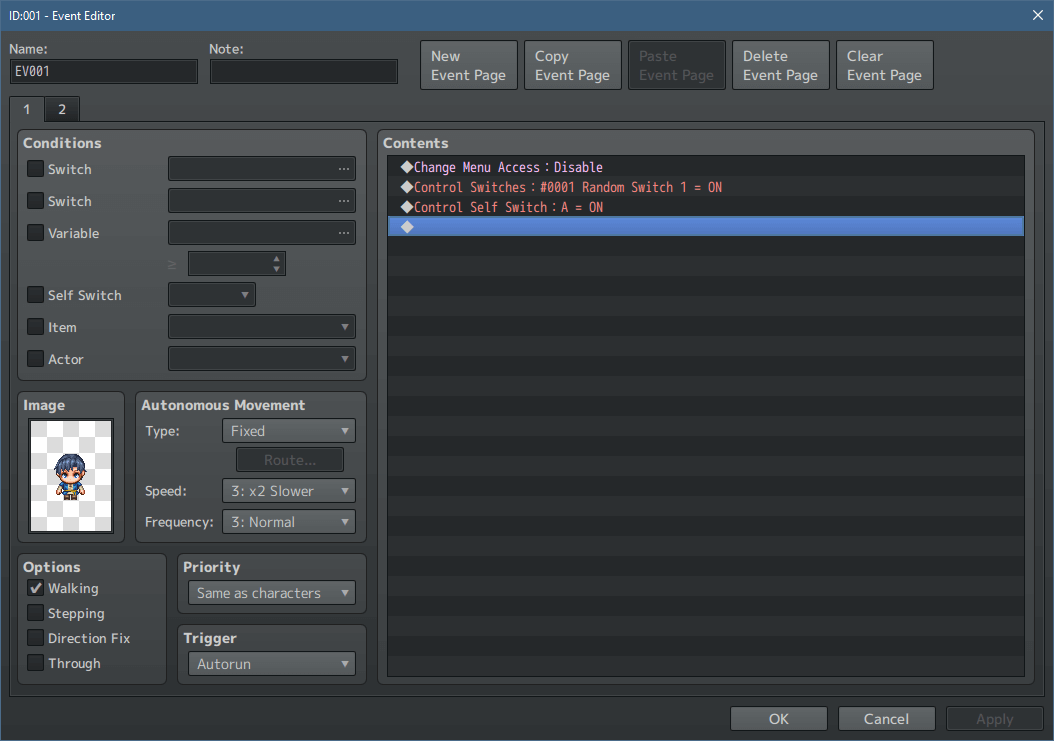
With our pictures ready, we can get the eventing started! We’ll be using a common event to control our picture menu, so the first thing we need is to turn Off the default menu and make our common event active by turning a switch On. We can do this step at the start of the game, or later on if we want to hold off on giving our player menu access right away.
Our switch will let our common event run as a parallel process in the background, so that our player can open the menu whenever they want. Because it’s a parallel process we’ll need to make sure to include a short wait to keep it from running too often, but as long as we take care with our events it shouldn’t cause lag. Alternatively, you could use a keybind plugin to tie our common event to a certain key.

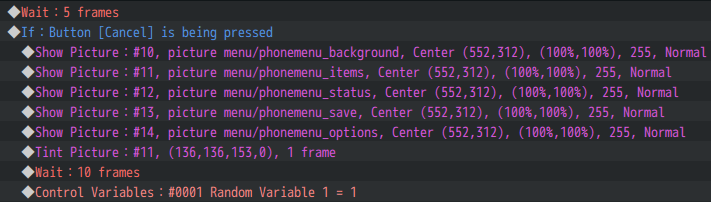
Since we aren’t using any plugins, we’ll keep things simple and open the menu when our player presses the default ‘cancel’ button. When the button is pressed it’s time for our menu to appear, so we need to show all of our pictures.

Having all our pictures appear is important, but there’s a problem already: what option is selected? If we don’t include some way to tell the difference between the selected menu option and the unselected ones, our player won’t be able to really use the menu.

To fix that, we can tint our menu’s first option right after it appears to make it stand out. Once our pictures are ready, we can set a variable to 1 so that our common event also knows which option is highlighted.
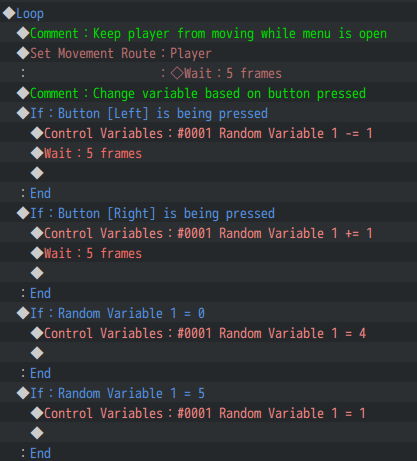
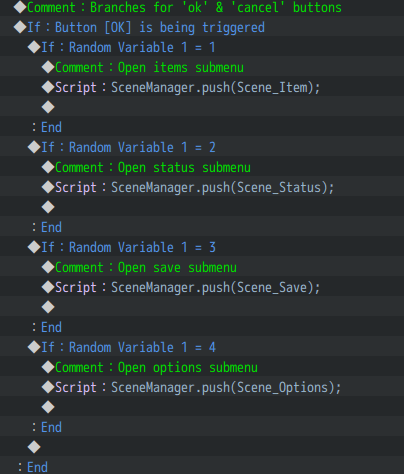
With our menu visible, we can move on to the interactive part. By putting this part all into a loop, our player will be able to move around the menu as much as they want since the control conditional branches repeat. We can use conditional branches to check if the ‘left’ or ‘right’ buttons are pressed, and add or subtract 1 to our menu variable to change the selected menu option. A short wait after a button is pressed will help slow the process down to a manageable speed and make it easier for our player to stop on the option they want. Since there is a set min and max for the variable (the first option and the last option), we also need some conditional branches to check if our variable goes above or below those limits and set it to an available number. For this menu, let’s have it loop around, so if our player holds the left button down it will loop from the first option to the last option.
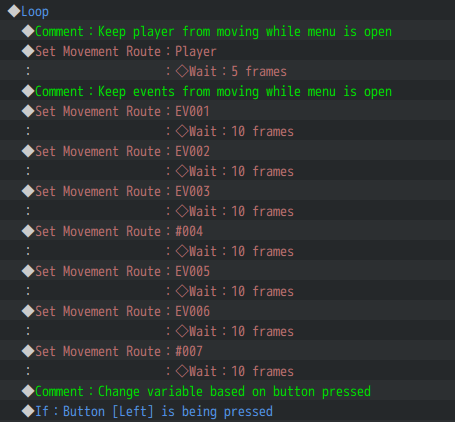
If you were to playtest at this stage, you’d find that our character can still move around while the menu is open because our common event is a parallel process. We don’t really want our character to wander into danger while the menu is open, so let’s include a move route to make our player wait the same amount of frames as when a button is pressed. That way our player will stay still until the menu is closed.
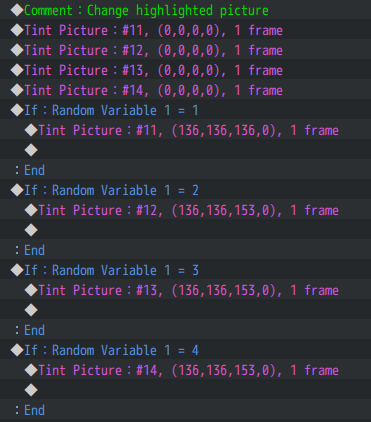
With our variable changed, now we need to change which option’s picture is highlighted. A simple way to do that is to tint all the options’ pictures back to normal and then set up a conditional branch for each possible variable number and change the tint for the related option’s picture.
Now we can open our menu and navigate around to each option. We’ll use a conditional branch to check if the ‘ok’ button is triggered, and if it is then open the selected menu option with a script call (since not every menu scene has a default event command). The script calls for some common menu scenes are:
Items: SceneManager.push(Scene_Item);
Skills: SceneManager.push(Scene_Skill);
Status:SceneManager.push(Scene_Status);
Save: SceneManager.push(Scene_Save);
Load: SceneManager.push(Scene_Load);
Options: SceneManager.push(Scene_Options);
Our menu only includes the items, status, save, and options submenus, so those are the script calls we’ll be using. When the ‘ok’ button is hit, the selected menu scene will open, our player can do whatever they need to, and then when they exit that scene they can keep using our picture-based menu.
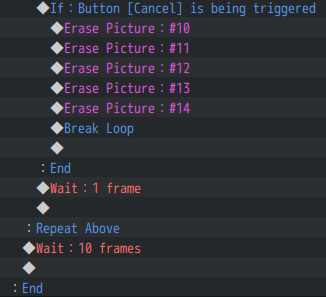
Lastly, we need to make sure there’s a way to exit the menu when our player is done, so we need one last conditional branch that checks if the ‘cancel’ button is pressed and then erases all our menu’s pictures and breaks the loop to let our player get back to the main game. A short wait will give our player time to release the ‘cancel’ button and keeps our player from accidentally reopening the menu.
Once we’ve put this all together, we end up with this common event:
Then we can playtest and make sure our menu is behaving properly!
If things seem to be moving too quickly, you can adjust the wait time when the left and right buttons are pressed or switch them to Trigger so that the player can’t skip over an option by holding down the button.
But what about other events on the map? While our player is stuck in place when the picture menu is open, the other events are still free to move around, possibly moving right next to our player. That may be a good side effect for a horror game, but if you want the events to also pause then you’ll need to add something to the common event. There are a few plugins out there that can freeze events in place, but if you’re not using them and only have a few events on your maps then the easiest method is to include move routes for each event that forces them to wait for a few frames.
And now you can make your own picture-based menus! Since this setup is easy to adjust, you could turn this main menu setup into a fast travel menu where each option can warp your players to the right place or make an in-game computer with bonuses like minigames or concept art for your players to discover. How would you use a picture-based menu in your game?