November 9, 2021
On-map enemies can force a player to make tough decisions while exploring dungeons. Should they take the path with more enemies but also more treasure, or play it safe and sneak around? But those choices don’t matter all that much if the enemies can’t respawn.
Respawning enemies gives players the chance to grind if they want, or just makes a dungeon stay dangerous throughout the game. So let’s look at three ways we can make our enemies respawn: map-based, time-based, and trap-based respawns.
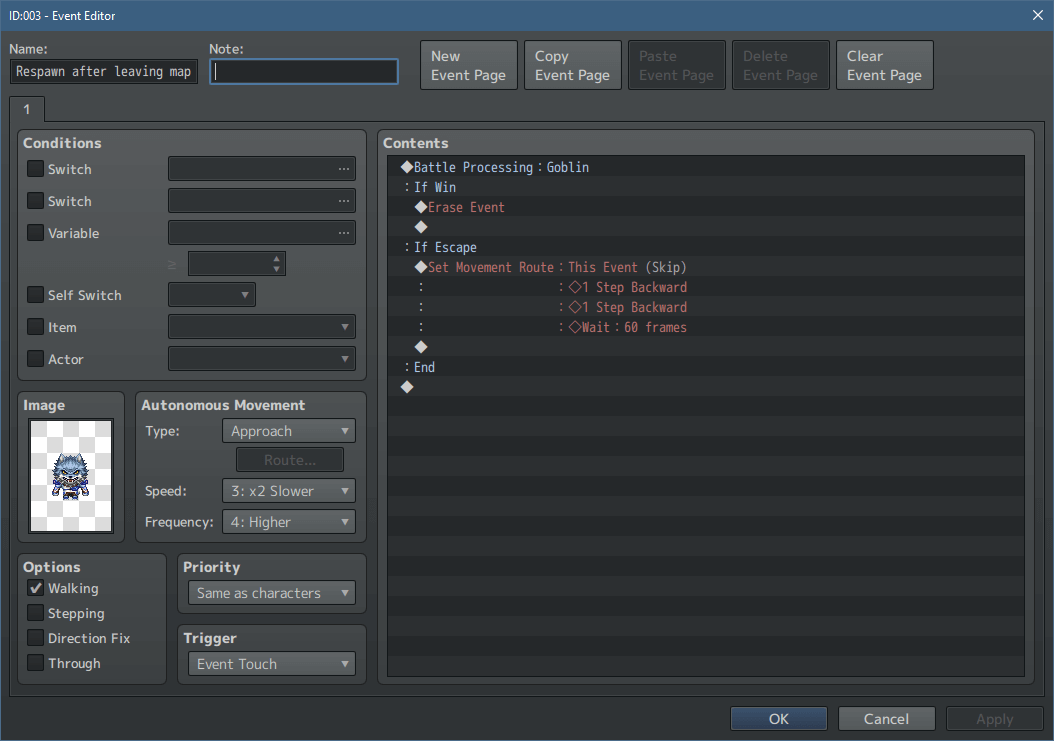
One of the simplest ways to have an on-map enemy respawn is to have it respawn only after the player leaves the map. The in-engine tutorial covers making an enemy respawn in a similar way, but it’s still good to take a look at this option.
Our enemy event can be set up to approach the player and trigger when the event touches the player, activating a battle. Since for this tutorial we’re focusing on the respawn and not the battle, we can fight a weak enemy for all these versions to quickly get through the battles. If we win the battle, then the Erase Event command runs to remove the event until we re-enter the map.
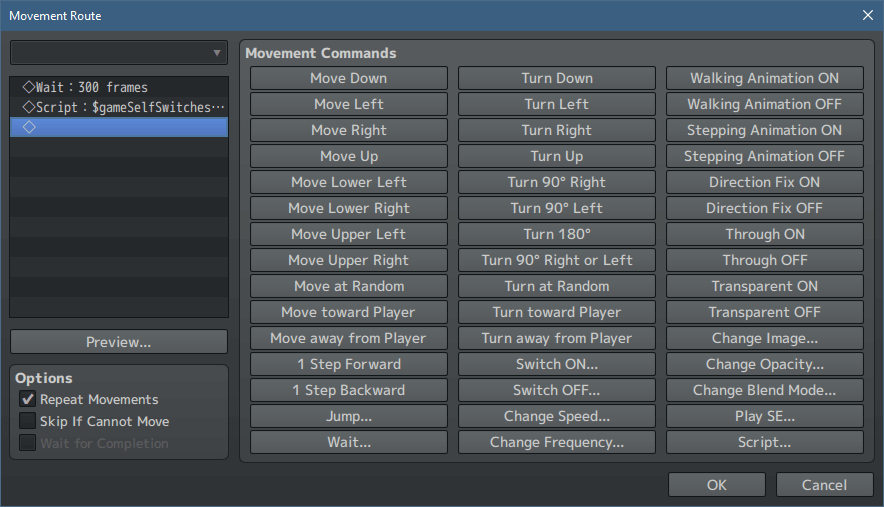
If we want to be able to escape the battles, we should make sure that we give ourselves enough time to escape the enemy. Let’s do that by setting up a move route to have the enemy take two steps back and then wait a second before the enemy can move again. By checking the ‘skip if cannot move’ option and unchecking the ‘wait for completion’ one, we’ll still be able to move around while the enemy is going through its move route.
This option gives our players the chance to defeat all the enemies on the map and then explore safely without having to worry about a monster sneaking up on them. But what if you wanted to keep your players on their toes? Then going with time-based respawns may be a better choice.
Enemies that respawn after a certain amount of time can offer a new challenge to players. Defeating all the enemies on a map doesn’t mean that they’re safe forever, so players will have to decide if it’s smart or not to lollygag in areas.
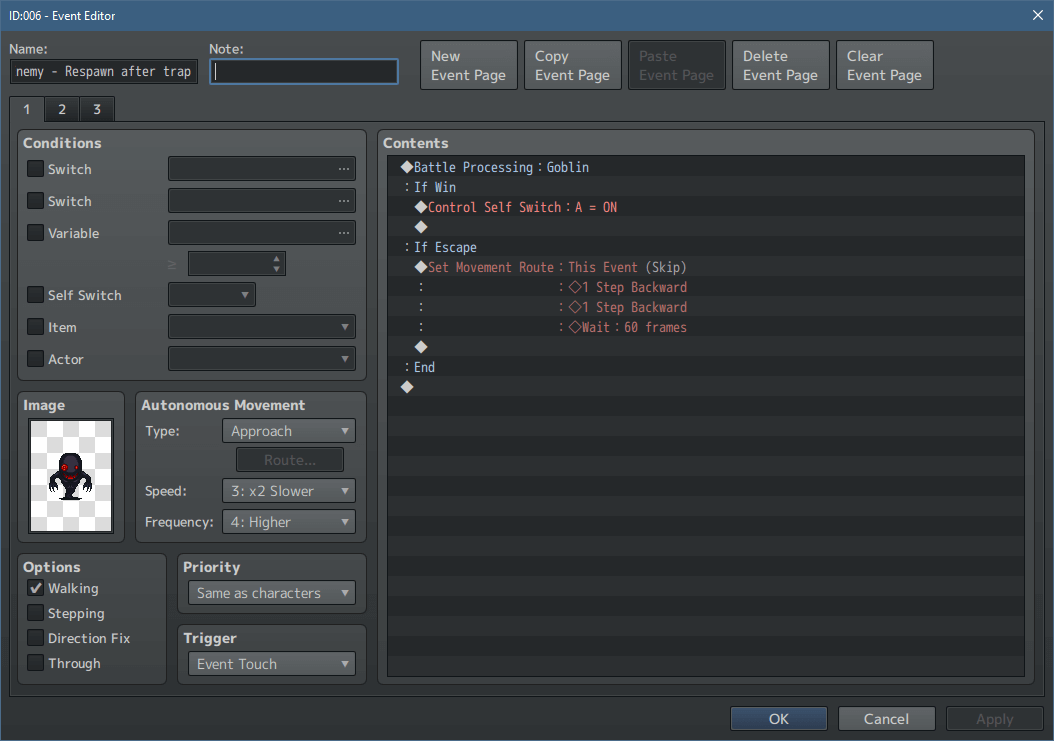
Our enemy event will be set up the same way as before, though this time we’ll need 2 pages for the event. When the enemy is defeated, we’ll turn on self switch A to activate the second page.

The enemy’s second page has a damaged frame chosen and is set to Through so that we can get past it if it trapped us in a corner. While we could use the contents section to wait some time and then turn the self switch A off with the event’s trigger set to ‘parallel process’, for this example let’s use the event’s autonomous movement to handle the wait and self switch.

The event’s move route is made up of a wait for 300 frames (5 seconds) and then the script call $gameSelfSwitches.setValue([$gameMap._mapId, this.eventId(), 'A'], false); to turn this event’s self switch A off. Once the self switch is off, our enemy will pop back up and be ready to chase the player again.
Now, using two pages works well, but what if you needed to use your self switches for something else, like modifying which enemies appear? Then why not make it all work on a single page?
Instead of turning a self switch on, we’ll set up a move route for the event to turn Through to on and then change to a damaged frame. Because the default damaged frames all share sprite sheets, we’ll need to make sure to turn the event to face the right direction (in this case left for the zombie) before we change to the damaged sprite sheet. There is a minor problem with doing it this way though: we can’t choose which damaged position we want to use! Since by default the engine chooses from the same column when switching sprites, our downed zombie would be using the middle column. It would work fine, but if we want to choose the exact frame then we’ll need to use a script call. this._originalPattern = N; lets us pick which column the sprite will use, just by changing N to 0 if we want the left column, 1 for the middle column, and 2 for the right column. So if we want to use the damaged frame in the right column, we’ll use the script call this._originalPattern = 2; .
With our enemy’s damaged sprite chosen, we can move on to the wait in the move route. 300 frames is enough time for this tutorial, and once it’s passed we can bring our enemy back to life by changing it back to the walking sprite, resetting its pattern to start from the middle column with this._originalPattern = 1; , and then turning Through back off so that we can battle it again.

And as long as we uncheck ‘wait for completion’, our players can move around and get past the defeated enemy before it respawns!
The respawn options we’ve already covered are great if we want the player to be unable to control when enemies respawn, but what if we wanted to boobytrap a treasure chest that the players needed to fight their way to reach, only to realize they’ll need to fight again to escape? Then we’ll need to change up our respawn methods.
First, let’s set up our enemy events. The first page will be similar to all the others, with self switch A being turned on if the player wins the battle.
The second page is set up like our time-based respawn, though with its move route fixed so that it won’t change until the trap is triggered.

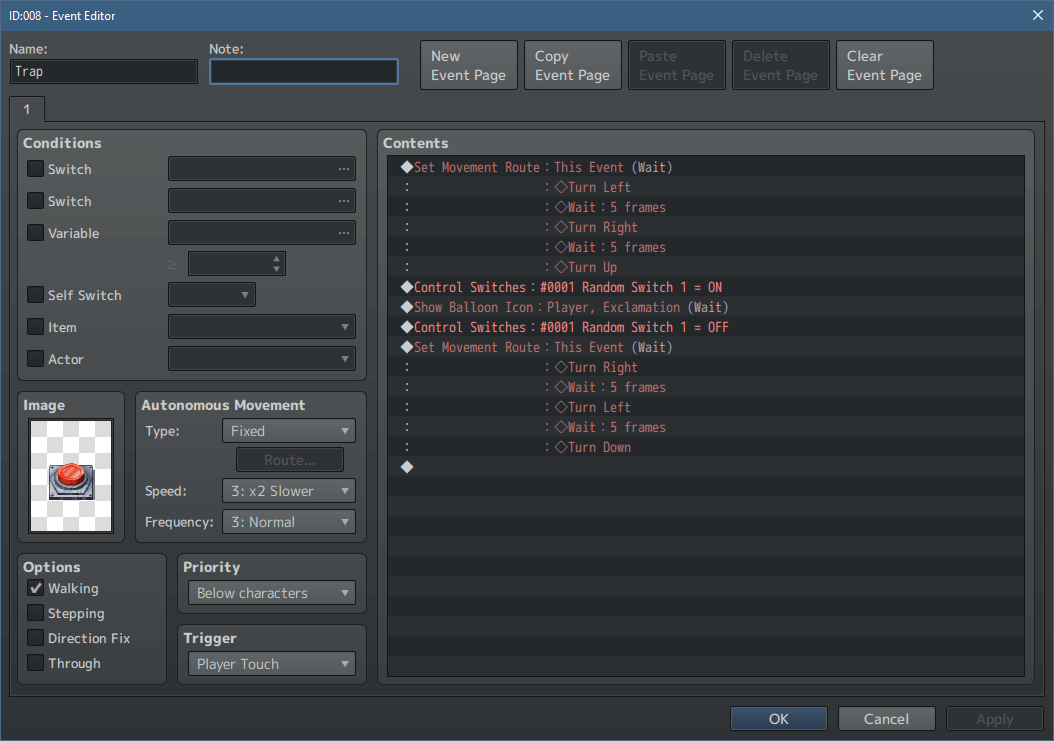
Page 3 is where our respawn happens, with the trigger set to ‘parallel’ and its self switch A turned off. To make sure our enemies don’t randomly respawn, we need to set the page’s conditions to activate only when we turn our specific trap switch on.

With our enemy events ready, we can move on to the trap event. For this example it’s a very obvious button, but we could use a switch hidden in the floor or even no image if we wanted the player to not know where the traps are. We just need to make sure that the event’s priority is set to ‘below characters’ and its trigger is ‘player touch’, so that when the player steps onto the event it will activate. Since our trap is a button, we can run a move route to press the button down before turning our trap switch on. Once our trap switch is on, the defeated enemy events nearby will activate their third page and bring them back to life. We should include a short wait (an exclamation balloon in this example) to make sure that all our enemies have time to respawn, before turning our trap switch off again. Then we can wrap up the trap event by having the button turn back to its default position.
With that, it’s ready to be used. We could scatter a few of these trap events around the dungeon, forcing our players to keep an eye out when running around the map.
And that’s 3 ways we could make our enemies respawn! Using a mix of them in dungeons, such as having strong foes disappear until they re-enter the map and having weaker enemies respawn after a few seconds, could make our players have to plan out what they’ll do next or help them decide if they should heal right away or hold off until they win the next battle. How do you handle enemy respawns in your games?